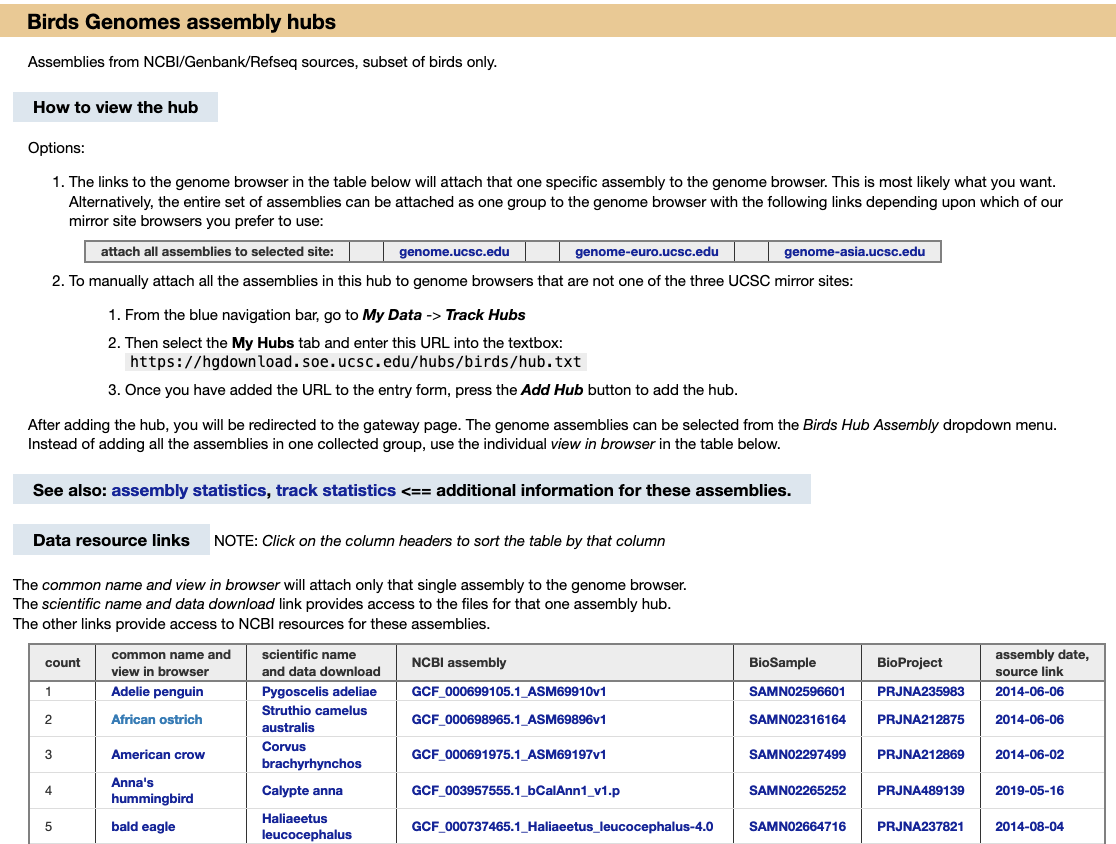
We provide a wide range of track hub settings (https://genome.ucsc.edu/goldenPath/help/trackDb/trackDbHub.html). In this blog post, we will emphasize 10 track hub settings that users may find useful but are often omitted from hubs.
10 track hub settings
- html
- useOneFile
- priority
- searchIndex
- filter
- spectrum
- mouseOver
- detailsDynamicTable
- labelFields
- maxWindowCoverage
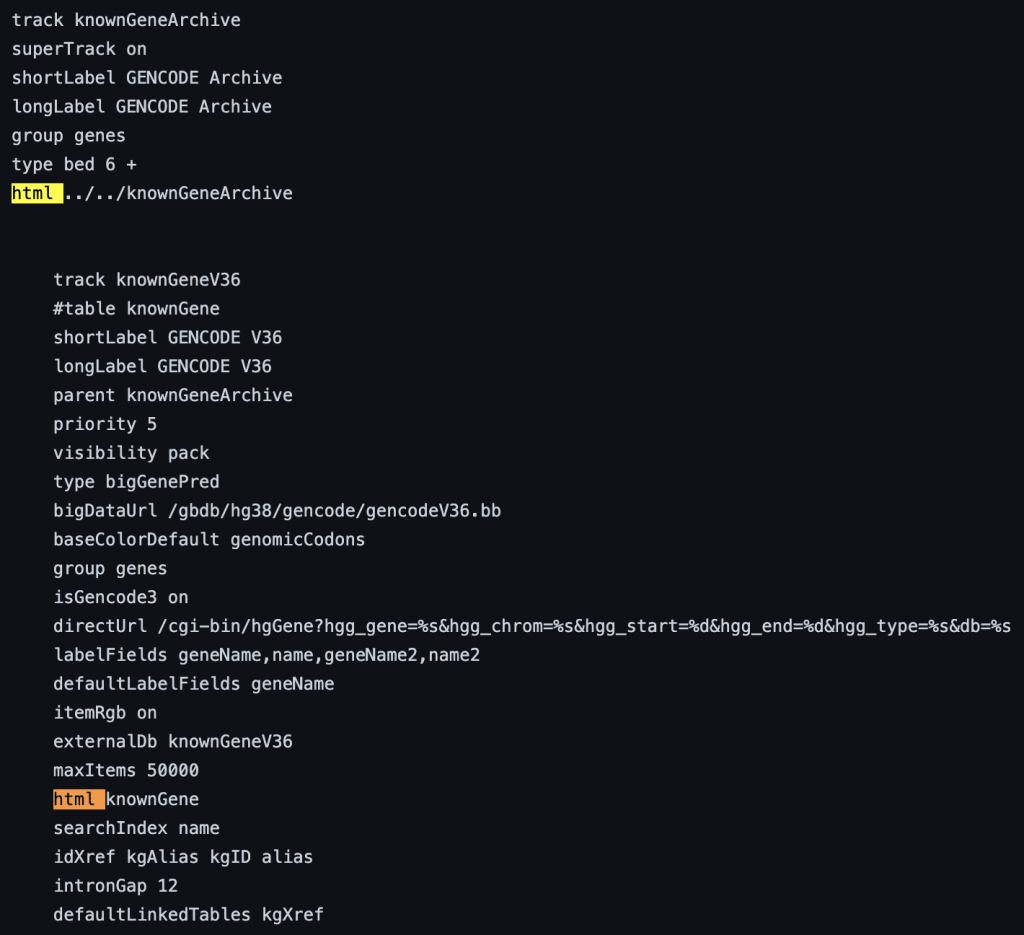
1. html setting
The html trackDb setting is an important setting that allows the display of a track description page in HTML format. Having a track description page provides more background, display details, and analysis that would help understand the data. The html setting is a requirement for a track hub to be considered listed in the UCSC Public Hubs (http://genome.ucsc.edu/cgi-bin/hgHubConnect). To add the setting, you add ‘html’ to the text block, or “stanza”, followed by either the relative path of the html file or the full path:
Relative path:
html path/docs/myTrack.html
Full path:
html https://server/path/docs/myTrack.html
You can also add the setting without the “.html” suffix:
html path/docs/myTrack
html https://server/path/docs/myTrack
In addition, the description html page should have the following sections: Track description, Display Conventions and Configuration, Methods, Credits, and References. More information on sections can be found on the template page: http://genome.ucsc.edu/goldenpath/help/examples/hubExamples/templatePage.html. Having a track description html page will save users time and minimize questions.
The following example shows a track using the html trackDb setting:
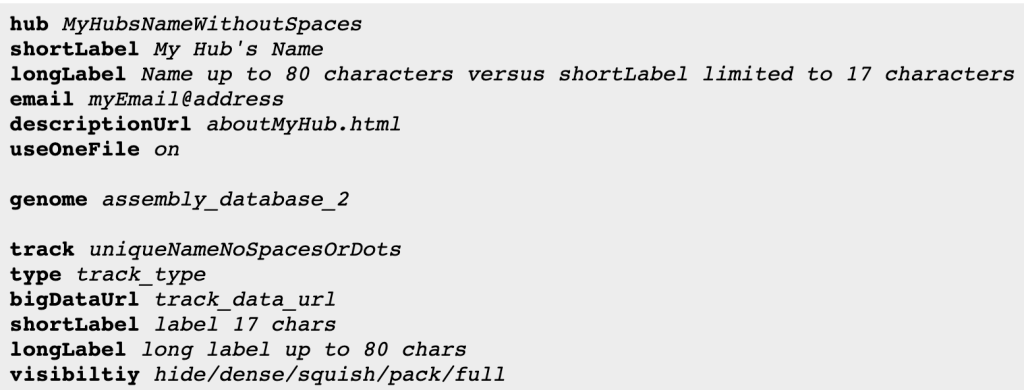
2. useOneFile setting
Conventionally, a track hub would consist of a minimum of three text files: trackDb.txt, genomes.txt, and hub.txt. The useOneFile trackDb setting allows the contents of all three files to be in one file, the hub.txt file. Using this setting limits the hub to only one assembly. The following stanza is a template for using the “useOneFile on” trackDb setting:
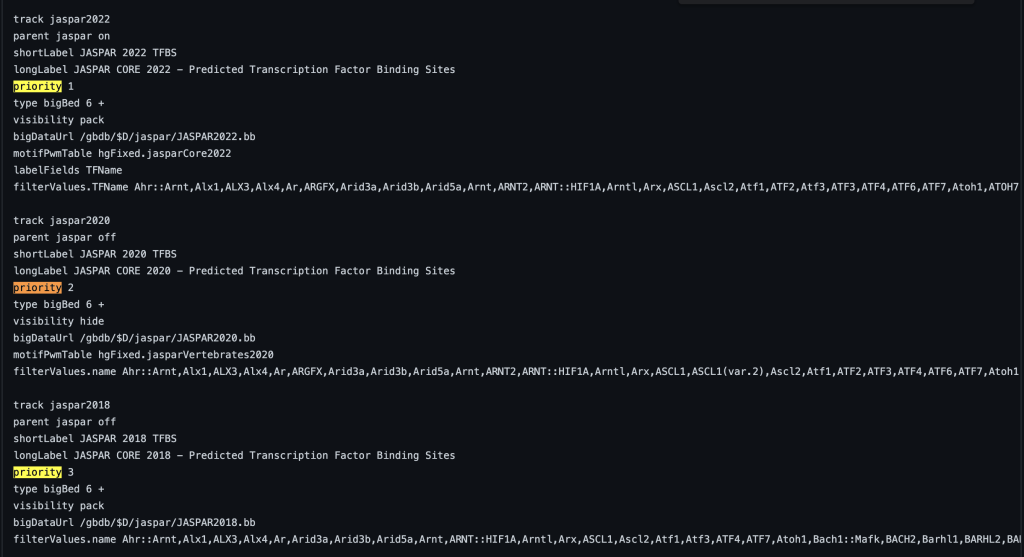
3. priority setting
The priority trackDb setting allows the ordering of tracks within a track group and the order within the browser graphic image. Typically the setting is used for tracks that are displayed by default. Default tracks are usually the most popular or helpful tracks available on a specific genome browser. The priority trackDb setting allows the selection of tracks to be displayed ahead of other tracks in ascending priority order. The setting can be useful for nesting tracks in a specific order, such as in a composite track. The default tracks are then followed by the unprioritized tracks which are sorted alphabetically by the short label. Adding priority followed by a floating point number to the stanza enables the setting:
priority 1
You can also add decimal values. For example, a track with priority 1.1 will display after a track with priority 1. The following example shows a track using the priority trackDb setting in a composite track:
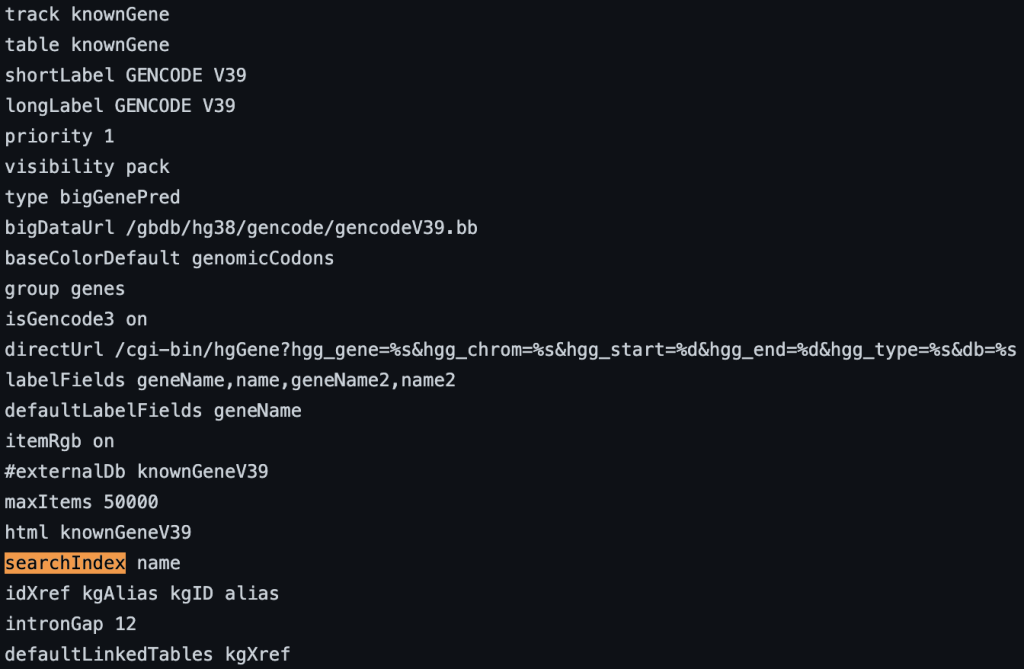
4. searchIndex setting
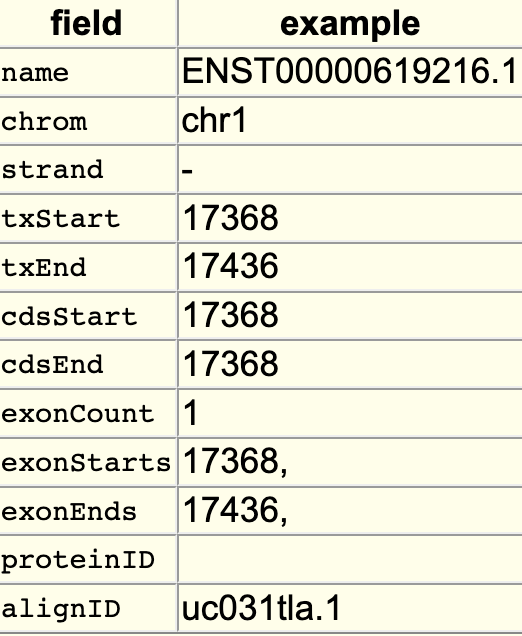
The searchIndex trackDb setting allows field names to be searchable in the position search box of the browser. To enable the setting, you would first have to create a bigBed file using bedToBigBed with the -extraIndex setting. For example, using the following bigBed fields:
If you run the setting as -extraIndex=name, then you will be able to search on the “name” field by adding the “searchIndex name” setting to the stanza:
searchIndex name
You can also add multiple fields. If the name is found using the search box then the position of the term will be displayed. If there are multiple matches then a list of positions will be displayed. The following example shows a track using the searchIndex setting:
For more information on creating a bigBed file with extra (custom) fields, see the following help page: https://genome.ucsc.edu/goldenPath/help/bigBed.html#Ex3. While searchIndex expects a search string with an exact match, another setting for Track Hubs, searchTrix (https://genome.ucsc.edu/goldenPath/help/trackDb/trackDbHub.html#searchTrix) allows for a fast look-up of free text associated with a list of identifiers, such as in the name field.
5. filter setting
The filter trackDb setting allows you to enable filtering for numerical or text data within a field of a bigBed file. First, you would need to enable the configurable features of the bigBed, which is done by adding a period ” .” or plus ” +” to the type bigBed line in the stanza:
type bigBed 5 .
type bigBed 9 +
Then, to enable filtering of numerical data, you would need to add a filter.fieldName setting. Typically the score field is used as the fieldName in filter.fieldName setting. To enable filtering for the score field with a default value of 0, you would add “filter.score 0” to the stanza:
filter.score 0
The setting will then make the filter option on the track hub description page available:

If you want to add a minimum limit value to filter data then you can add the value to the filter.fieldName setting. For example, if the score field consists of data values from a range 1-10, and if you want to filter values from 4-10, you would add:
filter.score 4
In addition, you can also change the default filter message by the filterLabel.fieldName setting. You would add:
filterLabel.score Score (4-10)
The settings will display the following filter option on the track hub description page:

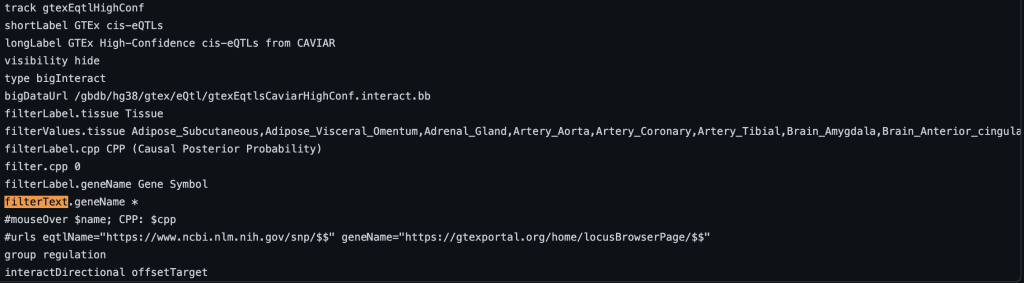
To enable text filtering, you would need to add a filterText.fieldName setting. Typically the name field is used as the fieldName in the filterText.fieldName setting. This will allow you to search and display exactly the searched term, or only part of the search term. To enable text searching for the name field with the default value, you would add “filterText.name *” to the stanza:
filterText.name *
The setting will then make the filter option on the track hub description page available:

The following example shows a track using the filterText trackDb setting with geneName as the fieldName and no default value:
For more information on filter settings and examples, see the following quick start guide: http://genome.ucsc.edu/goldenPath/help/hubQuickStartFilter.html
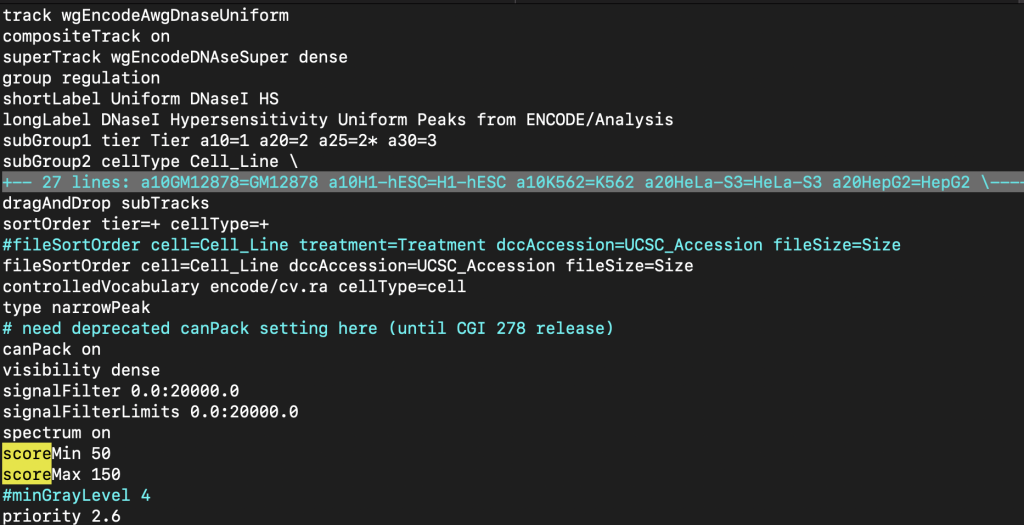
6. spectrum setting
The spectrum trackDb setting enables the score field to be used as a shading factor in the browser graphic. The lower score values are shaded in light gray by default, while higher scores are shaded towards black. The shading ranges from score values 0-1000. To enable the spectrum setting, you would add “spectrum on” to the stanza:
spectrum on
The upper and lower limits for the spectrum setting can be adjusted so the shading can be a range of specific values. The scoreMax setting defines the upper limit, and the scoreMin defines the lower limit. For example, the shading of a set of score values from 1-10 can be adjusted with an upper limit of 10 using the scoreMax setting.
spectrum on
scoreMax 10

The following example shows a track using the spectrum trackDb setting with scoreMin and scoreMax:
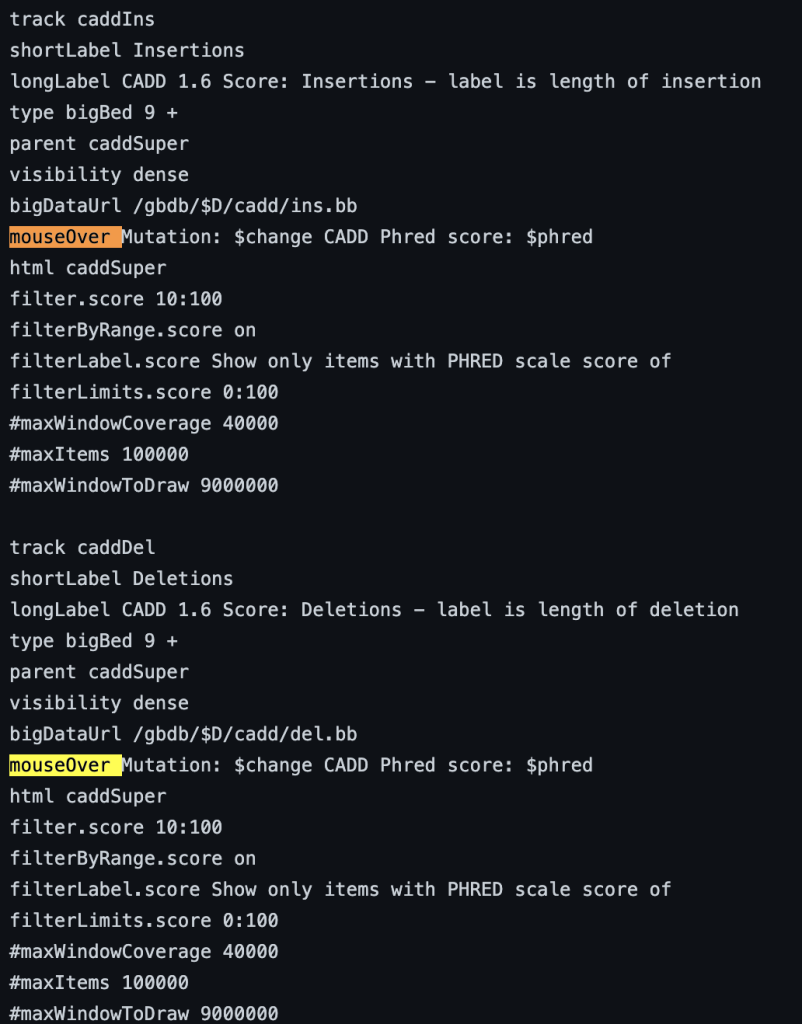
7. mouseOver setting
The mouseOver trackDb setting allows bigBed files with 9 fields or more to have a mouse over text display.

To enable the mouseOver setting, you would need to add the “mouseOver” setting, then the “$” character followed by the fieldname:
mouseOver $fieldname
You can also add any combination of additional fields and plain text to display:
mouseOver Displaying $name which $gene is the gene at $chrom for mouseOver setting

The following example shows a track using the mouseOver trackDb setting:
8. detailsDynamicTable setting
The detailsDynamicTable setting allows for the display of a table in html format on an items’ description page. To enable the setting, you would first have to create a bigBed file with a field that will consist of specific characters, “|” and “;” used to make a table. For example,
row_name|data_value;row_name1|data_value1;row_name2|data_value2The “|” splits the cell and “;” makes a new row:

For example, using a bed4+1, saving the following as example.bed:
chr1 100 200 itemOne row_name|data_value;row_name1|data_value1;row_name2|data_value2
chr1 300 400 itemTwo different_row|data_value;different_row_1|data_value1;different_row_2|data_value2
Making an AutoSql format (.as) file describing the fields and saving it as example.as:
table detailsDynamicTable
"detailsDynamicTable example 2 items"
(
string  chrom;          "Reference sequence chromosome or scaffold"
uint    chromStart;     "Start position of feature on chromosome"
uint    chromEnd;       "End position of feature on chromosome"
string  name;           "item"
string  table;          "detailsDynamicTable table"
)
Then converting the example.bed to a bigBed using bedToBigBed:
bedToBigBed -as=example.as -type=bed4+1 example.bed hg38.chrom.sizes example.bb
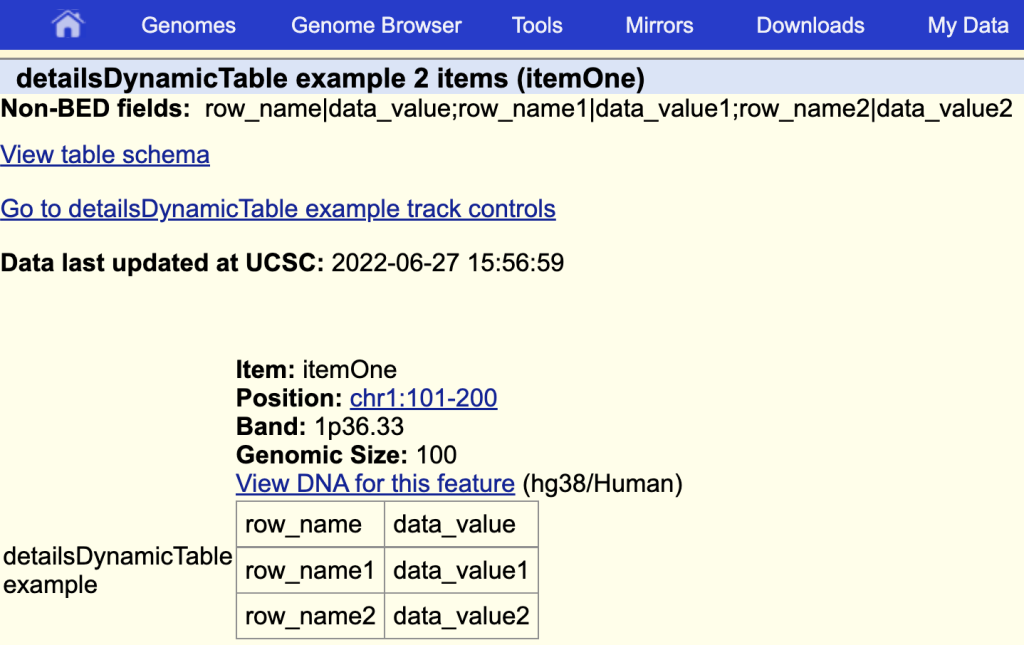
You can then use the setting by adding the “detailsDynamicTable” then the fieldName:
detailsDynamicTable table
The items description page with the table:
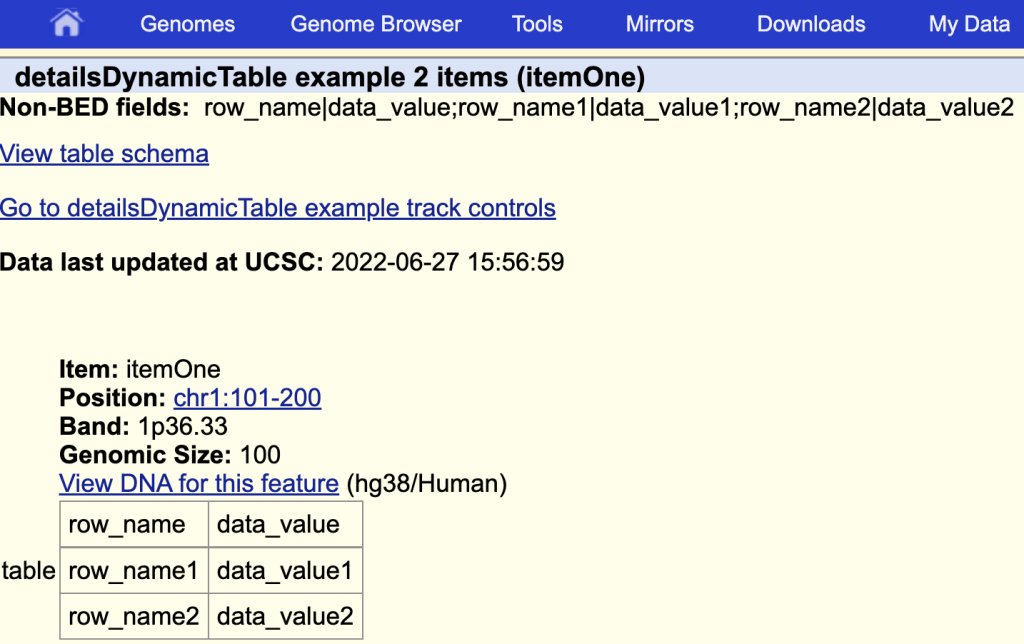
You can add a title by adding a ‘|’ and the table title after the field name:
detailsDynamicTable table|detailsDynamicTable example
The items description page with the table and a table title:
You can also use JSON format with detailsDynamicTable. More information on the detailsDynamicTable setting can be found on the Track Database Definition page: https://genome.ucsc.edu/goldenPath/help/trackDb/trackDbHub.html#detailsDynamicTable.
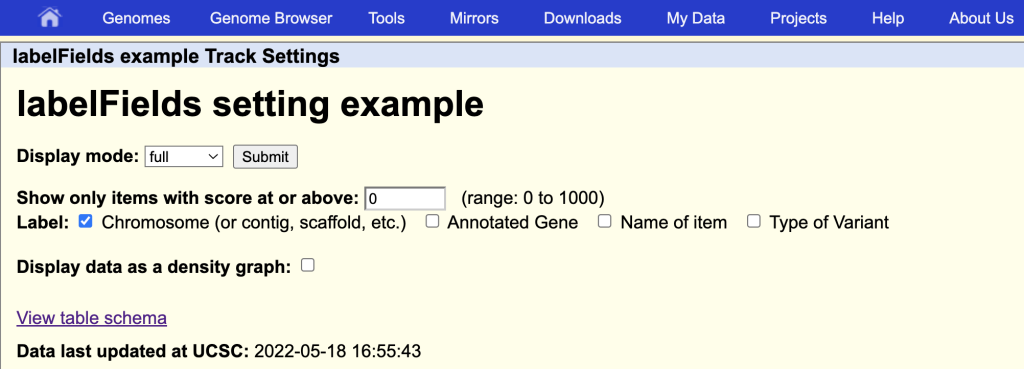
9. labelFields setting
The labelField trackDb setting allows the display of a specific bigBed field as the label of the item on the browser graphic. To enable the labelFields setting, you would need to add the “labelFields” setting, then a bigBed fieldName:
labelFields fieldName
For example, using the “chrom” field as a label:
labelFields chrom
The track displays the chromosome as the label:

You can also add additional field names:
labelFields chrom,gene,name,variantType
This will enable the additional field names as label options on the track hub description page:
You can also add the special value “none” if no labels are desired to be displayed on the browser graphic.
labelFields none
The following example shows a track using the labelFields trackDb setting:

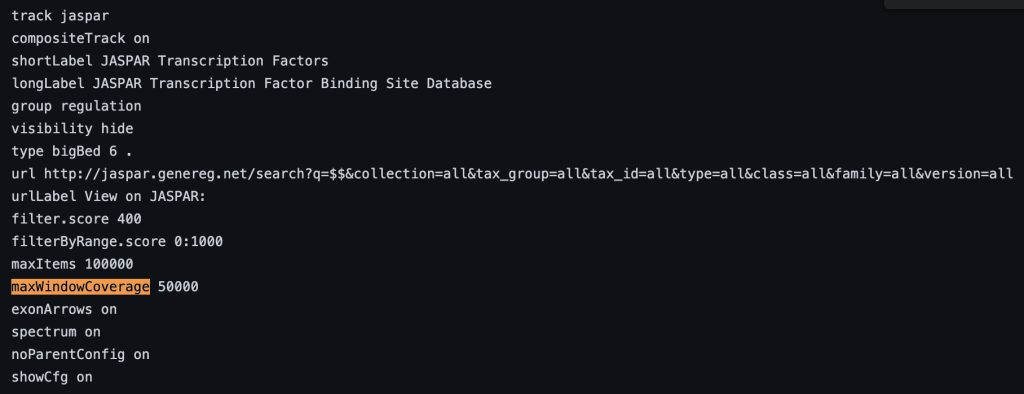
10. maxWindowCoverage setting
The maxWindowCoverage setting allows for a track to switch into a density coverage graph when the graphic display window contains more than the specified number of bases. The maxWindowCoverage setting can be helpful when a track has too many individual bed items in a browser graphic display. To enable the maxWindowCoverage setting, you would need to add the maxWindowCoverage setting, then a specific integer.
maxWindowCoverage integer
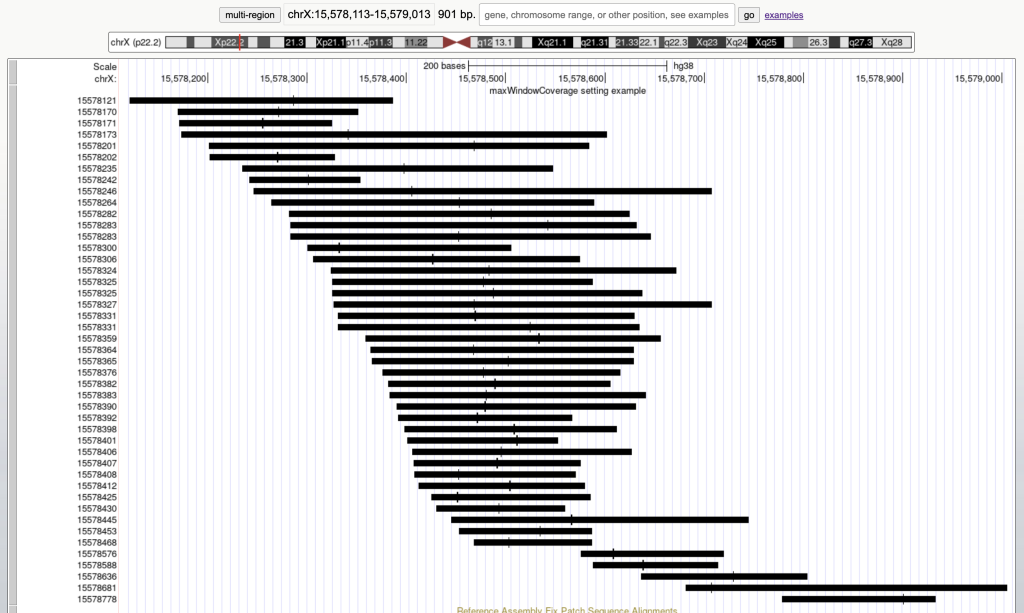
For example, the following graphic display has 45 bed items over a span of 901 bases:
Then adding the maxWindowCoverage setting with the integer 900:
maxWindowCoverage 900
Switches the bed items display to a density coverage graph when the browser graphic has a span of over 900 bases. The following are the 45 bed items over a span of 901 bases:

The following example shows a track using the maxWindowCoverage trackDb setting:
For more information on track hub settings, please see the following page: Hub Track Database Definition
If you have questions about using track hub settings, please feel free to contact us!
If after reading this blog post you have any public questions, please email genome@soe.ucsc.edu. All messages sent to that address are archived on a publicly accessible forum. If your question includes sensitive data, you may send it instead to genome-www@soe.ucsc.edu.


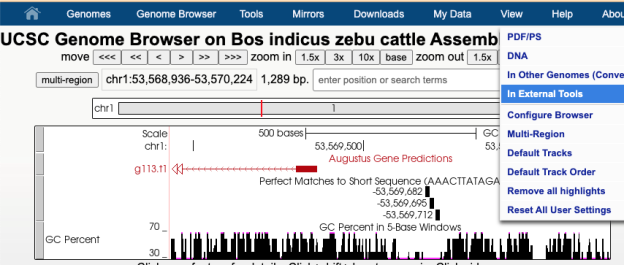

 In this image a 7,477 bp region will be selected to be sent to external sites where selecting “In External Tools” under the View menu will result in a pop-up of various options.
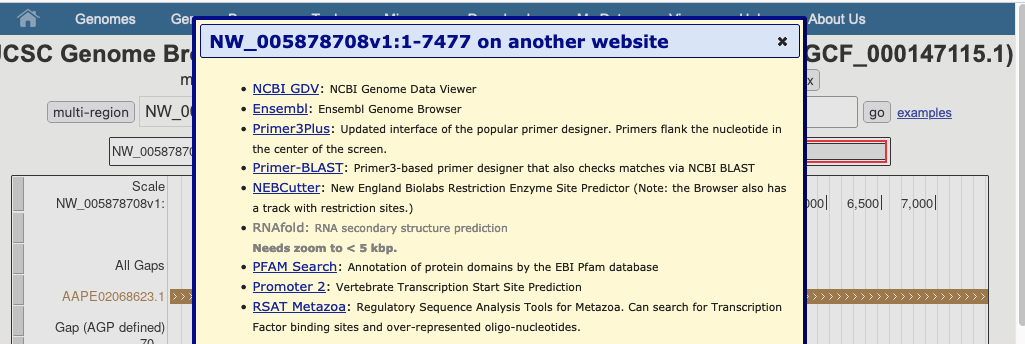


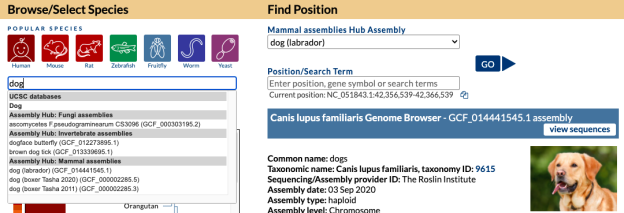
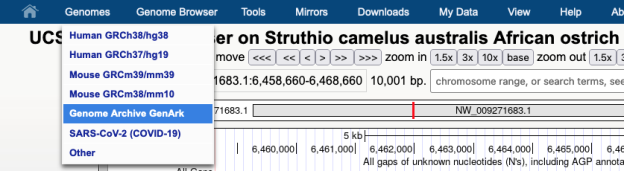
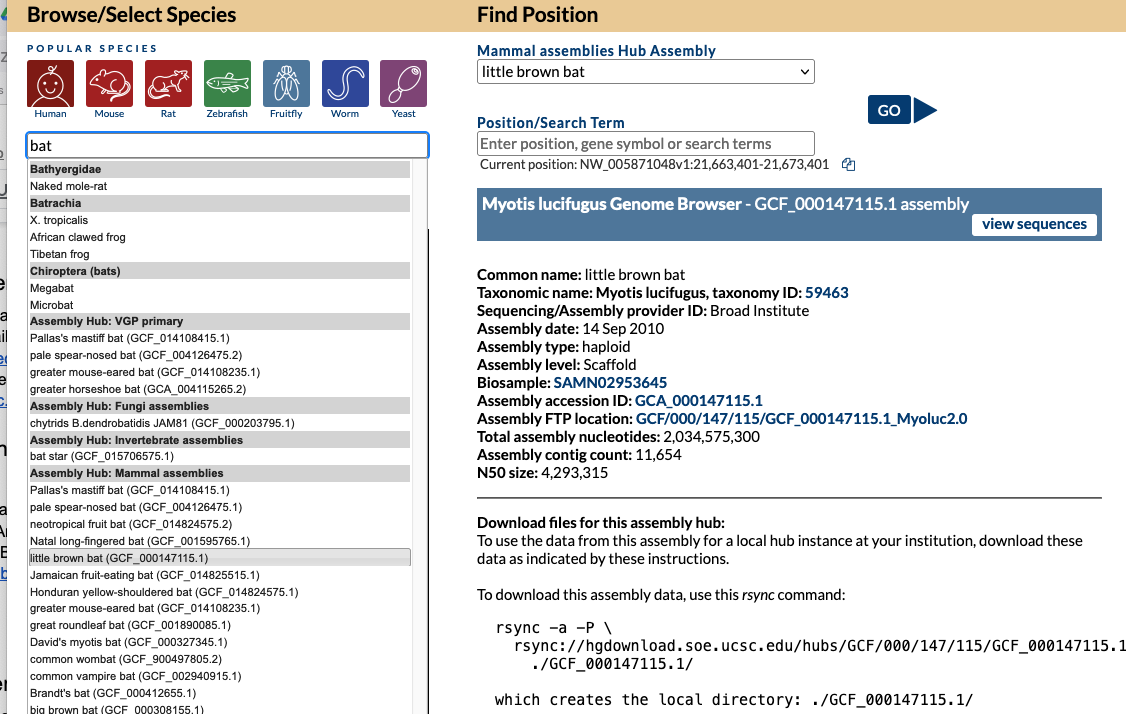
 On the Gateway page in the top left box you can search a term such as “dog” and find all the genomes both hosted in our internal databases and in external Public Hubs that have dog in the name. In this image, a search for “dog” returns a top “Dog” match (UCSC database) as well as results for several species in Assembly Track Hubs that match on the term “dog” with the specific labrador dog breed selected from the GenArk Mammal Assemblies Hub (GCF_014441545.1).